
Every family seems to have someone who makes the braided bread with the colorful eggs tucked right into the dough, and every year someone else asks how it’s done. The answer is simpler than it looks on the table. Easter bread colored eggs come together with a basic sweet dough, a handful of dyed eggs, and one braid no special pans, no fancy piping, no advanced baking skills required.
By the end of this guide, you’ll have a golden, slightly sweet braided wreath with bright dyed eggs baked right into the loaf, ready to set out for brunch or give as a gift. The eggs cook along with the bread in the oven, so there’s no separate boiling step to manage.
This isn’t a fast recipe, but it isn’t a hard one either. Most of the time is spent waiting on the dough to rise, not actively working. Set aside a morning, plan your rise times around something else you’re doing at home, and you’ll have a bread that looks like it came from a bakery window. Let’s start with the eggs, since they need to cool before they go anywhere near the dough.
- 4 to 6 raw eggs, room temperature
- Egg dye tablets or liquid food coloring
- White vinegar (for dyeing)
- 3 ½ cups all-purpose flour
- 2 ¼ teaspoons active dry yeast (1 packet)
- ¾ cup whole milk
- ⅓ cup granulated sugar
- 2 large eggs, plus 1 for egg wash
- ¼ cup melted butter, cooled
- 1 teaspoon salt
- 1 teaspoon vanilla extract
- Zest of 1 lemon or orange (optional)
- Sprinkles or pearl sugar (optional, for topping)
- Dye your eggs before you start the dough
- Warm your milk to wake up the yeast
- Proof the yeast until it foams
- Mix the wet ingredients together
- Add the dry ingredients and form a shaggy dough
- Knead the dough until smooth and elastic
- Let the dough rise until doubled
- Punch down the dough and divide it into three
- Roll each piece into a long rope
- Braid the three ropes into a wreath
- Tuck the dyed eggs into the braid
- Let the shaped dough rise a second time
- Brush with egg wash before baking
- Bake until golden brown
- Cool completely before slicing
Dye your eggs before you start the dough

Raw eggs take dye the same way hard-boiled ones do, and they’ll finish cooking later in the oven. Dissolve one dye tablet in ¾ cup hot water with 1 teaspoon vinegar for each color, following the box directions. Dip the raw eggs and hold for the full time listed:
- Pale colors: 1 to 2 minutes
- Deep colors: 4 to 5 minutes
- Lift with a spoon, not your fingers
- Set on a paper towel to dry completely
Refrigerate the dyed eggs until you’re ready to braid.
Warm your milk to wake up the yeast
Heat the milk gently in a small saucepan or the microwave until it reaches 110°F to 115°F warm to the touch but not hot enough to feel uncomfortable on your wrist. Milk that’s too hot will kill the yeast before it ever gets going, and you won’t find out until your dough refuses to rise an hour from now. A kitchen thermometer takes the guesswork out of this step entirely.
Proof the yeast until it foams
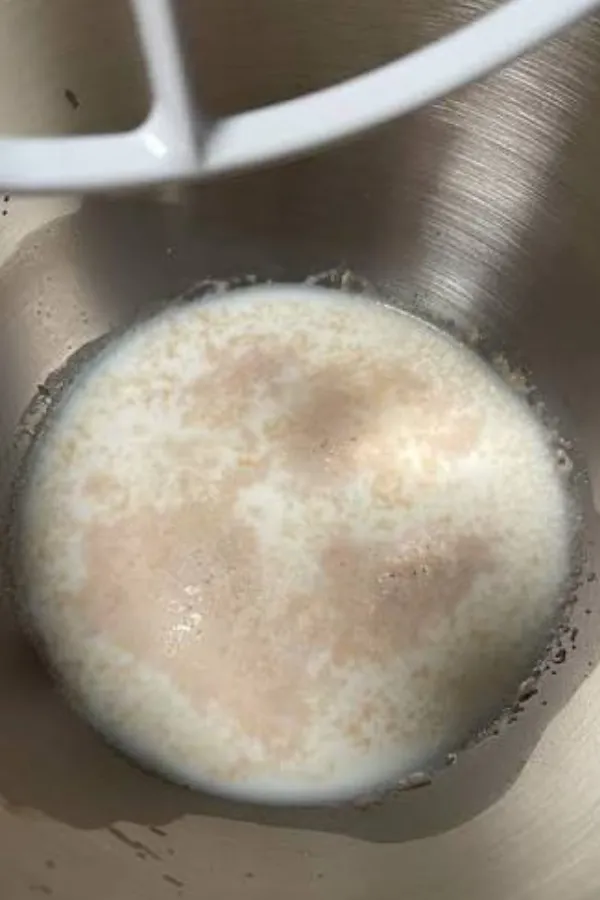
Pour the warm milk into a large mixing bowl and sprinkle the yeast over the top along with 1 tablespoon of the sugar. Let it sit undisturbed for 5 to 10 minutes. You’re looking for a thick, foamy layer on top — that’s the yeast waking up and feeding on the sugar. If the surface stays flat and smooth after 10 minutes, the yeast is dead and won’t rise the dough, so start over with a fresh packet.
Mix the wet ingredients together
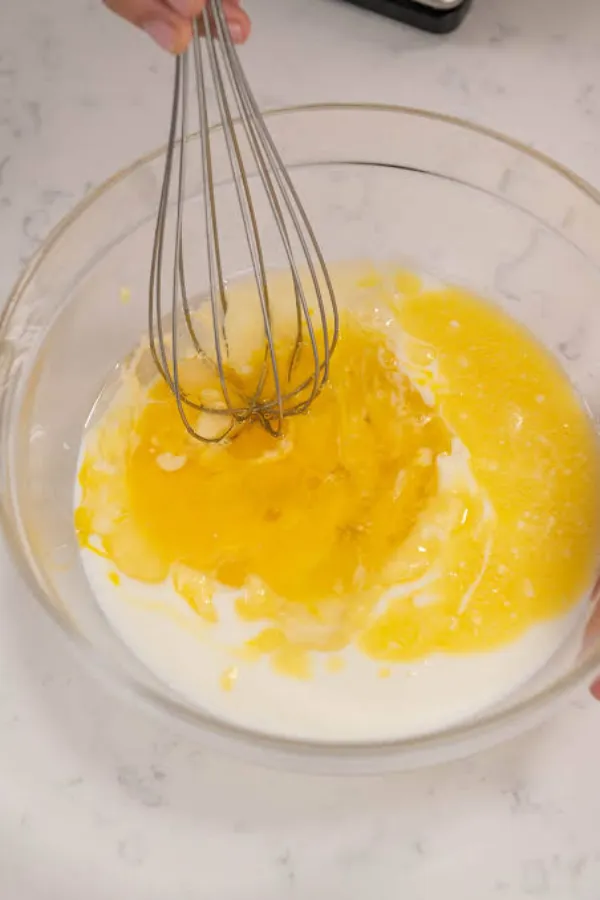
Once the yeast mixture looks foamy and alive, crack in the 2 large eggs, then add the melted butter, vanilla, and remaining sugar. Whisk everything until it’s one smooth, pale yellow mixture with no streaks of egg white left visible. If you’re using lemon or orange zest, stir it in now it blends more evenly into the wet mixture than it does once flour is involved.
Add the dry ingredients and form a shaggy dough
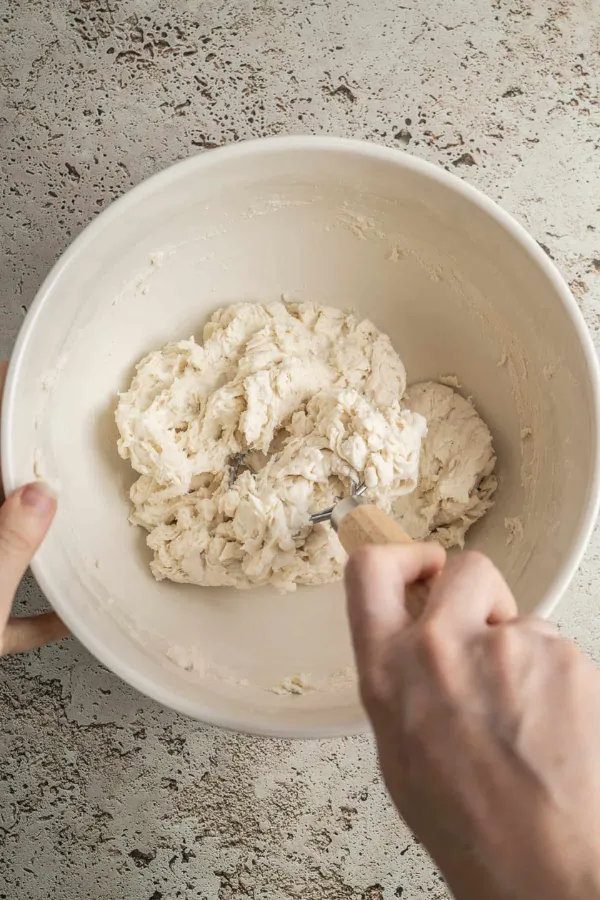
With the wet mixture ready, add the salt and 2 cups of the flour first, stirring with a wooden spoon or spatula. The dough will look loose and sticky at this stage, and that’s expected. Add the remaining 1 ½ cups flour gradually, a half cup at a time, stopping as soon as the dough pulls together into a rough, shaggy ball that no longer clings to the sides of the bowl.
Knead the dough until smooth and elastic
Turn the dough out onto a lightly floured counter. Ten minutes of kneading is what most beginners underestimate — press the dough away from you with the heel of your hand, fold it back over itself, turn a quarter turn, and repeat. Knead for 8 to 10 minutes total, until the dough feels smooth, springs back when poked, and no longer sticks to your hands.
Let the dough rise until doubled
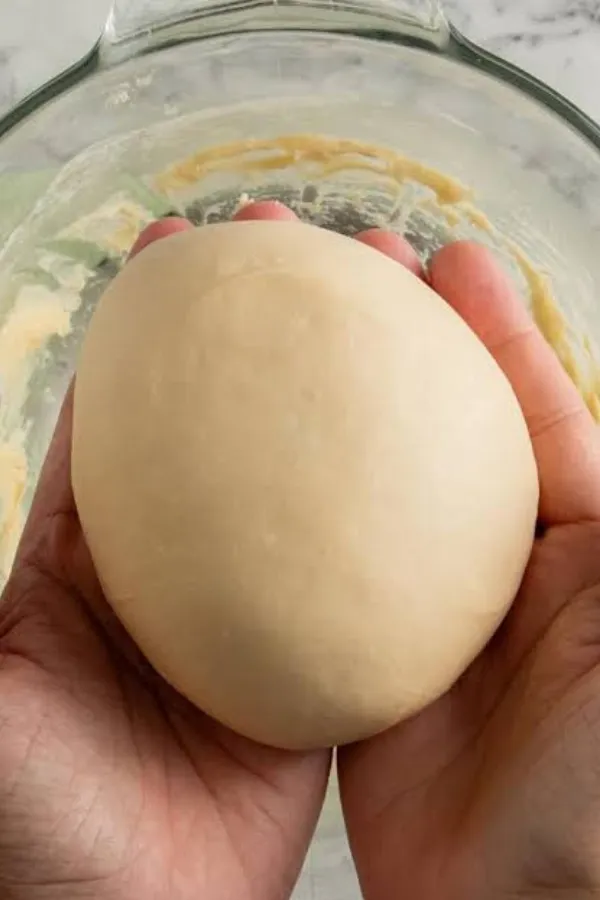
Shape the kneaded dough into a ball and place it in a large, lightly oiled bowl, turning it once so the top gets coated too. Cover with a damp kitchen towel or plastic wrap and set it somewhere warm and draft-free — the top of the fridge or inside an unheated oven with the light on both work well. Let it rise for 1 to 1 ½ hours, until it has roughly doubled in size.
Punch down the dough and divide it into three
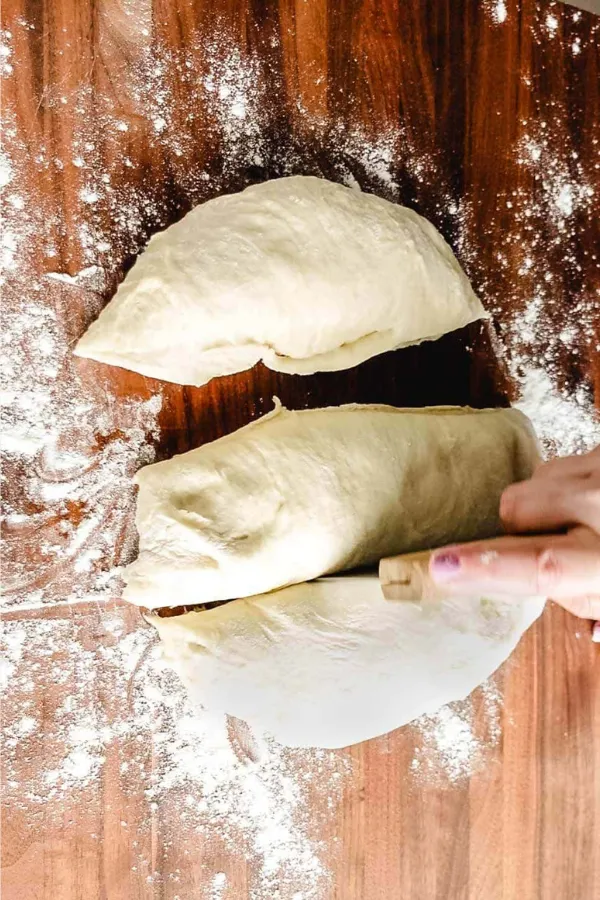
Press your fist gently into the center of the risen dough to release the trapped air you’ll hear a soft sigh as it deflates. Turn the dough out onto a clean, lightly floured surface. Using a bench scraper or a sharp knife, cut it into three equal pieces. A kitchen scale makes this easy: weigh the whole dough first, then divide that number by three.
Roll each piece into a long rope
Working with one piece at a time, roll it under your palms on an unfloured surface, moving your hands outward as you go. Aim for a rope about 14 to 16 inches long and roughly even in thickness from end to end. An unfloured surface actually helps here — a little friction gives your hands something to grip, so the dough doesn’t just spin in place. Keep the other two pieces covered while you work.
Braid the three ropes into a wreath
Once all three ropes are rolled, line them up side by side and pinch the tops together to anchor them. Braid the way you would braid hair — left rope over the middle, right rope over the middle, repeating down the length. Keep the tension even but not tight; a too-tight braid will fight against the dough as it rises. When you reach the end, pinch the bottoms together, then curl the whole braid into a circle and pinch the two ends together to close the wreath.
Tuck the dyed eggs into the braid
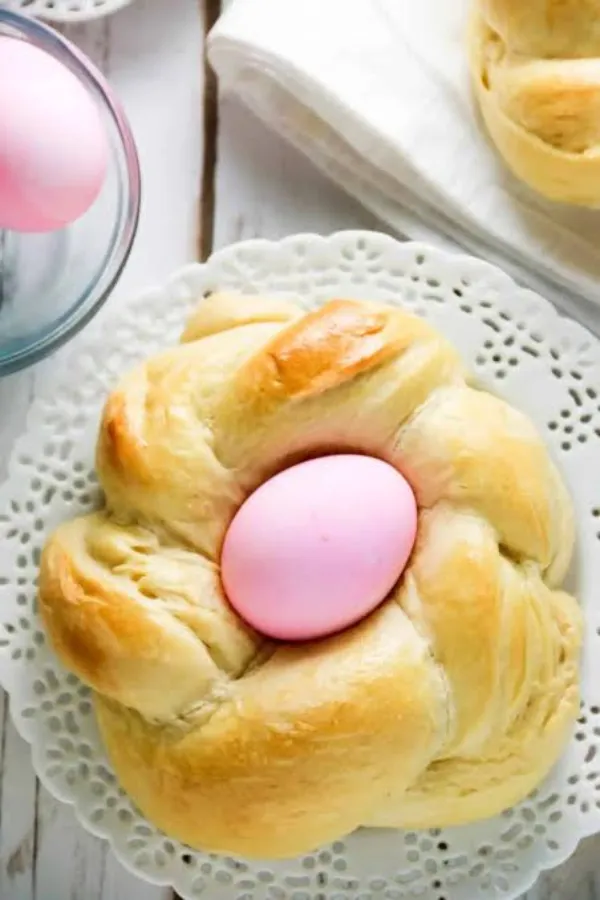
Space the dyed eggs evenly around the wreath, nestling each one into a gap between the braid strands. Four to six eggs is typical, depending on the size of your wreath. Push each egg down just enough that it sits snugly and won’t roll during the second rise — you don’t need to bury it, only wedge it in place. The dough will puff up around the eggs as it bakes, holding them in even more securely.
Let the shaped dough rise a second time
Transfer the braided wreath to a parchment-lined baking sheet, then cover it loosely with a clean kitchen towel. This second rise is shorter than the first give it 30 to 45 minutes, until the braid looks noticeably puffier but hasn’t fully doubled again. Skipping this rest is tempting when the finish line feels close, but a wreath that goes into the oven without it bakes up tight and dense instead of light.
Brush with egg wash before baking
A shiny, golden crust doesn’t happen on its own — it comes from an egg wash brushed on right before baking. Whisk the remaining egg with 1 tablespoon of water, then use a pastry brush to coat the entire surface of the braid, avoiding the eggs themselves. If you’re adding sprinkles or pearl sugar, press them on now while the wash is still wet so they stick during baking.
Bake until golden brown
Preheat your oven to 350°F while the wash sets for a few minutes. Bake the wreath for 28 to 32 minutes, rotating the pan halfway through for even color. The bread is done when the crust is deep golden brown and the loaf sounds hollow when tapped on the bottom. If the top browns too fast before the center finishes, tent it loosely with foil for the last 10 minutes.
Cool completely before slicing
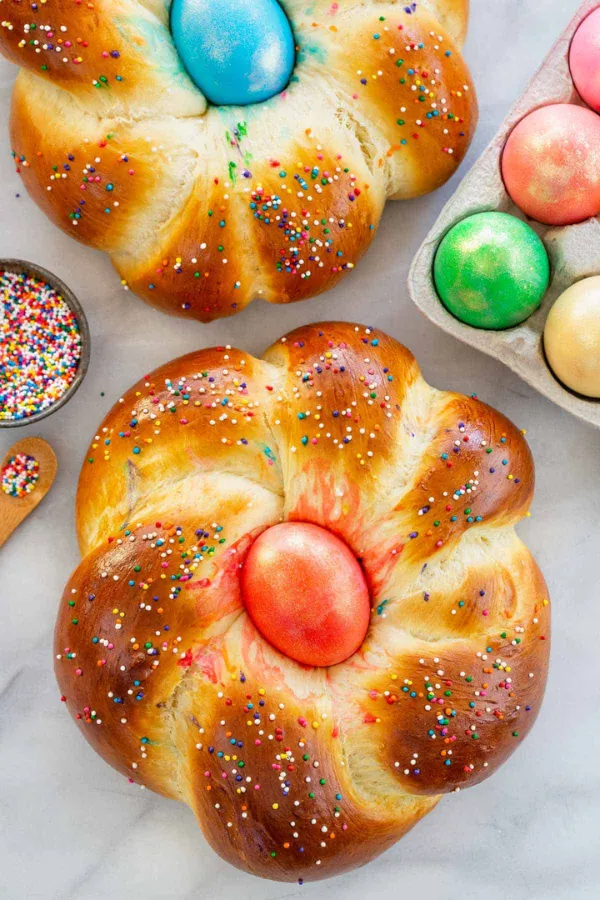
Move the wreath to a wire rack right away so the bottom doesn’t steam and turn soggy. Waiting is the hardest part of this whole process, but cutting in too soon causes the soft crumb to compress under the knife. Let it cool for at least 1 hour before slicing, and check that the baked eggs have fully set before serving.
| If This Happens | Try This |
|---|---|
| Dough never rises after an hour | Your yeast was likely dead from milk that was too hot, or expired. Start a fresh batch and check that milk stays between 110°F and 115°F. |
| Bread is dense and heavy instead of soft | Too much flour was likely added during kneading, or the second rise was skipped or cut short. Next time, add flour gradually and give the full 30 to 45 minutes for the second rise. |
| An egg cracked in the oven | This happens occasionally with temperature changes and isn’t harmful. Wipe away any leaked white after baking, and nestle eggs a little deeper into the braid next time. |
| Crust browns too fast but center looks pale | Your oven likely runs hot. Tent the loaf loosely with foil once it reaches the color you want, then keep baking until it sounds hollow when tapped. |
- Dye eggs, refrigerate
- Warm milk to 110-115°F
- Proof yeast 5-10 min until foamy
- Mix in eggs, butter, vanilla, sugar
- Add flour, form shaggy dough
- Knead 8-10 min until smooth
- Rise 1-1 ½ hrs until doubled
- Punch down, divide into 3
- Roll each into a 14-16″ rope
- Braid ropes into a wreath
- Tuck dyed eggs into braid
- Second rise 30-45 min
- Brush with egg wash
- Bake 350°F, 28-32 min
- Cool 1 hr before slicing
Conclusion
You just turned a bowl of flour, a handful of dyed eggs, and a little patience into a centerpiece worth putting on the table. That braided wreath of Easter bread colored eggs is the kind of thing people photograph before they cut into it.
Next time, try swapping in natural dyes like beet juice or turmeric for a softer, homemade look. Save this recipe now so you have it ready when Easter morning rolls around.
Easter Bread Colored Eggs (Braided Wreath)
Ingredients
Equipment
Method
- Dye the raw eggs using dissolved dye tablets and vinegar, following box timing for desired shade. Refrigerate until ready to use.
- Warm the milk to 110°F to 115°F.
- Sprinkle yeast and 1 tablespoon sugar over the warm milk. Let sit 5 to 10 minutes until foamy.
- Whisk in eggs, melted butter, vanilla, remaining sugar, and zest if using.
- Stir in salt and flour gradually until a shaggy dough forms.
- Knead 8 to 10 minutes until smooth and elastic.
- Place in an oiled bowl, cover, and let rise 1 to 1 ½ hours until doubled.
- Punch down and divide into 3 equal pieces.
- Roll each piece into a 14 to 16 inch rope.
- Braid the ropes and curl into a wreath, pinching ends to seal.
- Tuck dyed eggs evenly into the gaps of the braid.
- Cover and let rise a second time, 30 to 45 minutes.
- Brush with egg wash; add toppings if using.
- Bake at 350°F for 28 to 32 minutes, until deep golden and hollow-sounding.
- Cool on a wire rack at least 1 hour before slicing.
Notes
- The dyed eggs are raw when tucked into the dough and cook fully during baking — no pre-boiling needed.
- For a shinier crust, apply a second light coat of egg wash halfway through baking (carefully, using oven mitts).
- Store leftover bread wrapped at room temperature for up to 2 days, or freeze without the eggs for up to 1 month.
- Natural dyes like beet juice, turmeric, or red cabbage water can replace boxed dye tablets for a softer color palette.